Top Tips for Glue Pull Repair Techniques in PDR
- David Fisher
- Apr 8
- 4 min read

When it comes to paintless dent repair (PDR), glue pull repair techniques have emerged as a game-changer for technicians and car owners alike. This method allows for effective dent removal without the need for repainting, preserving the vehicle's original finish. In this blog post, we will explore the top tips for mastering glue pull repair techniques, ensuring you can tackle dents with confidence and precision.

Understanding Glue Pull Repair
Before diving into the techniques, it's essential to understand what glue pull repair entails. This method involves using a special adhesive to attach a pulling tab to the dented area of the vehicle. Once the tab is secured, a pulling tool is used to gently pull the dent back into its original shape. This technique is particularly effective for shallow dents and can be performed on various surfaces, including metal and plastic.
Benefits of Glue Pull Repair
Preserves Original Finish: One of the most significant advantages of glue pull repair is that it does not require repainting, which helps maintain the vehicle's value.
Cost-Effective: Compared to traditional dent repair methods, glue pull repair can be more affordable, saving both time and money.
Versatile: This technique can be applied to a wide range of vehicles and dent types, making it a valuable skill for any PDR technician.
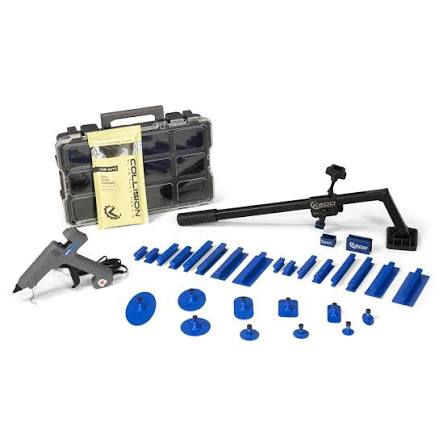
Essential Tools for Glue Pull Repair
To effectively perform glue pull repairs, you'll need the right tools. Here are some essential items to have in your toolkit:
Glue Gun: A high-temperature glue gun is crucial for applying the adhesive effectively.
Pulling Tabs: These come in various shapes and sizes, allowing you to choose the best fit for the dent you're working on.
Pulling Tools: Options include slide hammers and hand pullers, each offering different levels of control and force.
Heat Source: A heat gun can help soften the adhesive for easier removal and improve the bond between the tab and the surface.
Cleaning Supplies: Ensure you have isopropyl alcohol and microfiber cloths to clean the area before applying glue.
Preparing for the Repair
Preparation is key to a successful glue pull repair. Follow these steps to ensure you're ready to tackle the dent:
Assess the Damage
Before starting, carefully inspect the dent. Determine its size, depth, and location. This assessment will help you choose the appropriate pulling tab and technique.
Clean the Area
Use isopropyl alcohol and a microfiber cloth to clean the dented area thoroughly. Removing dirt and debris ensures a strong bond between the adhesive and the vehicle's surface.
Choose the Right Pulling Tab
Select a pulling tab that closely matches the size and shape of the dent. Using the correct tab will provide better results and minimize the risk of damaging the paint.
Mastering the Glue Pull Technique
Now that you're prepared, it's time to dive into the actual repair process. Follow these steps for effective glue pull repair:
Apply the Adhesive
Heat the Glue Gun: Allow your glue gun to heat up fully before use.
Apply Glue: Squeeze a generous amount of adhesive onto the pulling tab. Ensure it's evenly distributed for maximum adhesion.
Press the Tab: Firmly press the tab onto the center of the dent. Hold it in place for a few seconds to allow the adhesive to bond.
Pull the Dent
Attach the Pulling Tool: Once the adhesive has set, attach your pulling tool to the tab.
Apply Steady Pressure: Gently pull the dent using a steady, controlled motion. Avoid yanking, as this can cause further damage.
Check Progress: Periodically release the pressure to check the dent's progress. If necessary, reapply adhesive and repeat the pulling process.
Remove the Tab
Once the dent is pulled out, it's time to remove the tab:
Heat the Adhesive: Use a heat gun to soften the adhesive, making it easier to remove the tab.
Twist and Pull: Gently twist the tab while pulling it away from the surface. This motion helps break the bond without damaging the paint.
Post-Repair Inspection
After completing the repair, it's crucial to inspect the area thoroughly. Look for any remaining imperfections or signs of damage. If necessary, you can use a fine polishing compound to smooth out any rough spots.
Tips for Success
To enhance your glue pull repair skills, consider these additional tips:
Practice on Scrap Metal: Before tackling real dents, practice your technique on scrap metal to build confidence.
Use Quality Products: Invest in high-quality glue and tools to ensure the best results.
Stay Patient: Glue pull repair can take time, especially for larger dents. Be patient and allow the process to unfold.
Learn from Others: Attend workshops or watch tutorials from experienced technicians to gain insights and tips.
Troubleshooting Common Issues
Even with the best preparation, you may encounter challenges during glue pull repairs. Here are some common issues and how to address them:
Adhesive Not Bonding
If the adhesive isn't sticking, ensure the surface is clean and dry. You may also need to apply more glue or use a different pulling tab.
Dent Not Fully Removed
If the dent remains after the first pull, try reapplying adhesive and pulling again. Sometimes, multiple pulls are necessary for deeper dents.
Paint Damage
If you notice paint damage during the repair, stop immediately and assess the situation. You may need to consult a professional for further assistance.
Conclusion
Mastering glue pull repair techniques in PDR can significantly enhance your skills as a technician. By following the tips outlined in this post, you can effectively tackle dents while preserving the vehicle's original finish. Remember to invest in quality tools, practice regularly, and stay patient throughout the process. With dedication and practice, you'll become proficient in glue pull repairs, providing valuable services to your clients and ensuring their vehicles look their best.
Now that you have the knowledge, it's time to put it into action. Gather your tools, find some dents to practice on, and start honing your glue pull repair skills today!

Comments